How to Build a Complete CI/CD Pipeline Using GitHub Actions (Step-by-Step)
Automate testing, headless browser runs, build checks, and deployments directly from your GitHub repository.
What is CI/CD with GitHub Actions?
Continuous Integration (CI) automatically tests and verifies code every time a developer pushes a change. Continuous Deployment (CD) automatically delivers or deploys those changes to a staging or production server when tests pass.
GitHub Actions is an integrated CI/CD tool built directly into GitHub. It listens for events (like push or pull_request) and runs automated workflows on cloud-hosted virtual machines (Ubuntu, Windows, or macOS runners).
Step 1: Set Up Project Directory & Configure Headless Mode
In automated cloud servers (CI runners), there is no graphical monitor attached. Therefore, test frameworks (such as Playwright, Cypress, or Selenium) must be configured to run in headless mode (without launching a visible UI window).
Example: Configuring Headless Run Script in `package.json`
Make sure your package.json contains a script designed for headless execution:
{
  "name": "my-ci-app",
  "version": "1.0.0",
  "scripts": {
    "build": "react-scripts build",
    "test:headless": "playwright test --headed=false"
  }
}--headed=false ensures your test runner executes silently in memory, avoiding GUI dependencies that cause CI pipelines to fail.
Step 2: Add Environment Secrets to GitHub
Never commit hardcoded API keys, database URLs, or deployment tokens into your code repository. Store sensitive variables in GitHub Secrets instead.
- Go to your repository on GitHub.
- Click on Settings in the top tab menu.
- In the left sidebar, navigate to Secrets and variables > Actions.
- Click New repository secret.
- Enter a Name (e.g.,
API_TOKENorNETLIFY_AUTH_TOKEN) and paste the secret Value. - Click Add secret.
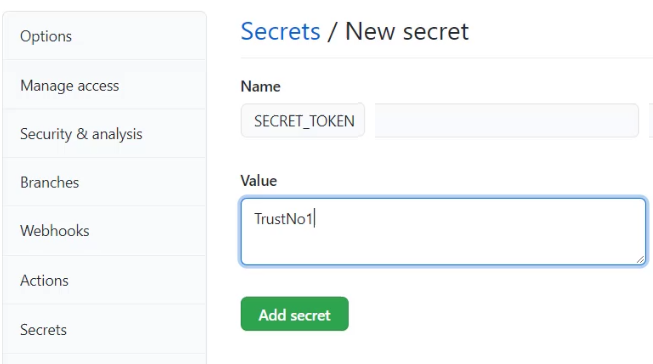
Figure 1: Configuring secure repository credentials in GitHub Actions Secrets.
Step 3: Create the `.github/workflows` Directory
GitHub Actions automatically detects workflow files located in a specific hidden directory path within your project root.
Create the following folder structure in your local project directory:
my-project/
└── .github/
    └── workflows/
        └── ci-cd-pipeline.yml
Figure 2: Workflow directory structure inside GitHub interface.
Step 4: Write the Workflow YAML File (`ci-cd-pipeline.yml`)
Open .github/workflows/ci-cd-pipeline.yml in your code editor (e.g., VS Code) and add the following production-ready workflow configuration:
name: CI/CD Automated Testing and Deployment

# 1. Trigger pipeline on code push or pull request to main branch
on:
  push:
    branches: [ main ]
  pull_request:
    branches: [ main ]

# 2. Define workflow jobs
jobs:
  test-and-build:
    runs-on: ubuntu-latest

    steps:
      # Step A: Checkout repository code into runner environment
      - name: Checkout Code
        uses: actions/checkout@v4

      # Step B: Setup Node.js runtime
      - name: Set up Node.js Environment
        uses: actions/setup-node@v4
        with:
          node-version: '20'
          cache: 'npm'

      # Step C: Install project dependencies
      - name: Install Dependencies
        run: npm ci

      # Step D: Install Headless Browsers (Playwright/Cypress setup)
      - name: Install Headless Browsers
        run: npx playwright install --with-deps

      # Step E: Run Automated Headless Tests
      - name: Execute Headless Automation Tests
        run: npm run test:headless
        env:
          API_SECRET: ${{ secrets.API_TOKEN }}

      # Step F: Build the production bundle
      - name: Build Application
        run: npm run build

  deploy:
    needs: test-and-build
    runs-on: ubuntu-latest
    if: github.ref == 'refs/heads/main'

    steps:
      - name: Deploying to Production
        run: echo "Deploying application after successful build & tests..."
Step 5: Push Code to GitHub & Trigger the Pipeline
Now that your .github/workflows/ci-cd-pipeline.yml file is ready, save it and push it to GitHub using Git Bash terminal commands:
# Check status of modified files
git status

# Stage the new .github folder and updated project files
git add .

# Commit changes
git commit -m "feat: Add GitHub Actions CI/CD pipeline with headless testing"

# Push changes to GitHub
git push origin main
Step 6: Monitor Pipeline Execution
Once you push the code, GitHub Actions triggers the workflow automatically.
- Go to your repository homepage on GitHub.com.
- Click on the Actions tab near the top.
- Click on your active workflow run (e.g., "CI/CD Automated Testing and Deployment").
- Click into individual steps to view real-time log outputs, test passes/fails, and deployment logs.
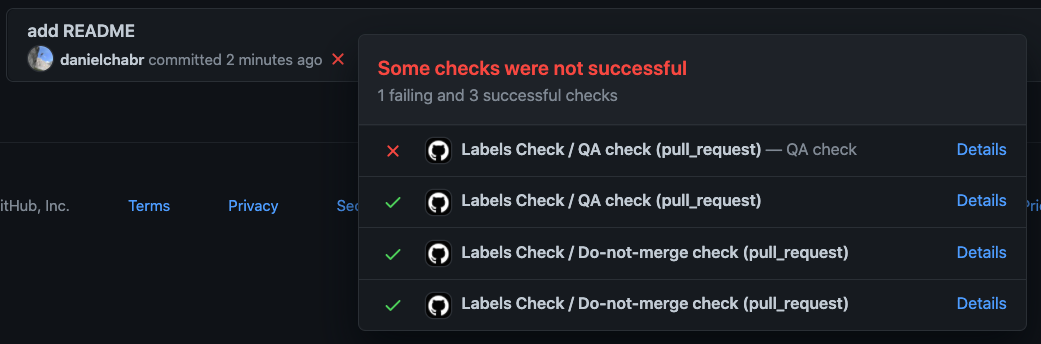
Figure 3: Monitoring active build and test steps inside the GitHub Actions dashboard.
GitHub Actions Syntax Cheat Sheet
| YAML Key | Description |
|---|---|
name: |
The display title of your workflow shown in GitHub Actions tab. |
on: |
Event triggers (e.g., push, pull_request, schedule). |
runs-on: |
Virtual environment OS (e.g., ubuntu-latest, windows-latest). |
uses: |
Reusable pre-built GitHub Actions (from GitHub Marketplace). |
run: |
Shell command(s) executed directly on the runner VM. |
needs: |
Defines dependencies between jobs (e.g., deploy waits for test to pass). |



No comments:
Post a Comment